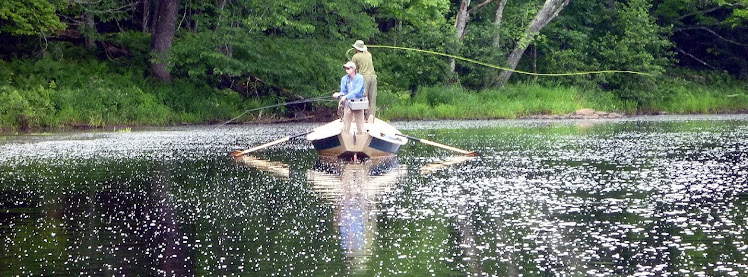
Please visit this page to find such things as: fly tying recipes with photos, or descriptions of different methods of using a specific technique (such as palmering) when tying a fly. Anything related to tying flies may be found on this page. But in addition to this, if the pattern happens, for example, to be a specific nymph, the 'Featured Article' page may also have a story on how the particular pattern has been used to successfully land fish. Also, I will utilize my 'Blog' or home page to announce when something new has been added to this page. If you wish to ask a question/comment about a posting on this page, go to the Home Page -same date- and write your comment there!
***The BB's Forage fly recipe is being modified, meaning simplified and fishified!!! I read through the original recipe below and was surprised I didn't give myself a headache. I have tied up a few "improved" versions, but I'm not totally happy yet. Version 2 is achieving a more "walk the dog" action, which has been a primary goal. Casting on the Mississippi River in February between thaws isn't the most conducive to studying fly action. It's hard to see into that cloudy water! Version 2 will remain light, shed water, and sink (not be neutrally buoyant), but will be easier and faster to tie, have a more fusiform shape, and walk the dog. No, it will not walk Buddy, the black lab, but it will "walk like a dog!" I don't expect to have an updated recipe posted until late Spring at the earliest. If you return here to look for it, let me know. That will get it posted sooner. I do know that version 2 will be ready to go for an upcoming Spring pike trip to Canada. 2/7/18. Thanks! Twitch ***
BB's FORAGE

210 denier waxed thread (or sz B Big Fly thread)
Bucktail, longer the better, taken from near tail tip. 2-3 colors.
1-2 colors of Krystal flash
1 color of thin flashabou (optional)
Yak hair (2 colors, 1 hank of each, brushed out, ~9-10” long & ¼” wide pressed between fingers)
2 similar size/shape barred hackle feathers
Ostrich plumes. 2 colors and 7-8, long strands (herl) of each.
1 plume of blood quill marabou
Subtle palmer flash material such as: Hareline’s Lrg Krystal Hackle or EP Anadromus Brush
Head cement
1/4” Hologram Eyes (optional)
UV-cured adhesive, epoxy, or urethane adhesive for head of fly
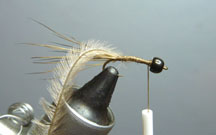
****The recipe for this fly has been improved & needs to be updated when time allows.****
**This is the current look of this fly**

1) Wrap thread back to hook point.

2a) Tie in a hank of bucktail & spread around hook shank.
2b) Tie in a slightly smaller hank of bucktail on top of hook shank above 1st buck tie-in. I typically blend or layer buck colors at this tie-in. I add cement after tie-ins.
3) Tie in similar color Krystal flash to bottom of fly & extending to tips of bucktail. (optional)


(The buck is the main belly of the fly. Rest of tie-ins will be on top side of fly unless otherwise noted. See pics for clarification)
<2/25/14: Update: I now tie in the short end ~1 inch~ of the yak hair facing back toward the rear of the fly>
4a) Tie in sparse amount of brushed-out Yak hair (~1/4” wide after brushed & pressed between fingers) slightly ahead of tie-in point of bucktail, starting thread wraps ~1/3 back from hook eye side of yak & allowing the tail of the yak to extend ~1.5” past the buck tail tips. Leave 1.5-2” of yak hair above the tie-in point. Be sure to firmly compress hair on top of fly, not at all on the sides! This is vital to prevent fouling of the hook. Add cement.
4a) Tie in sparse amount of brushed-out Yak hair (~1/4” wide after brushed & pressed between fingers) slightly ahead of tie-in point of bucktail, starting thread wraps ~1/3 back from hook eye side of yak & allowing the tail of the yak to extend ~1.5” past the buck tail tips. Leave 1.5-2” of yak hair above the tie-in point. Be sure to firmly compress hair on top of fly, not at all on the sides! This is vital to prevent fouling of the hook. Add cement.
4b) Now, fold back the yak hair which is in front of the tie-in and tie this down as well. Again, keep the hair firmly compressed to the top (not sides) of the fly. Add cement.


5) To mimic a lateral line, tie in up to 3 strands of a fine (thin) flashabou on both sides of the fly. This is optional & could be done after Step 6 as well.
6) Tie in barred hackle on each side of the fly. The hackle tips should extend to the yak tips on tail end of the fly.


7) Tie in 7-8 strands (herl) of ostrich plume, extending their tips equal to or up to ½” beyond the yak hair. You may also (optional) make a few thread wraps immediately under the plumes and just behind the tie-in point. This will lift the ostrich feathers, increasing the fly profile.


(Aside from the last wrap of buctail, you have just completed the lower portion of the fly. So far, the yak & ostrich are similar colors. The greatest color changes will start with the next step.)
8a) Reverse tie bucktail, being sure to spread it evenly around the hook shank. Cement.
8b) Fold the bucktail evenly back upon itself and tie in. Cement.


9) Tie in yak hair on top of hook shank, just in front of the folded bucktail. Extend tail-end ½” beyond hackle tips & leave about 1-1.5” in front of thread wraps. Do not yet fold back the excess yak hair. Cement. <2/25/14: Again, I now tie in the tip ends facing rear of fly>
10) Tie in 7-8 strands of long ostrich herl so tips of feathers equal or extend up to 1” beyond the tail-end of yak hair in preceding step. Again, you may add thread wraps under the under the feathers and behind the thread wraps to increase the fly profile. Leave ~1/4” of stem extending beyond these thread wraps & toward head of fly(not shown in photos). Then, fold stems back over herl and tie down. Cement over thread wraps.
11) Tie in Krystal flash, similar in color & tail length to ostrich feathers. Cement.


12) Now, simultaneously fold back the 1.5” of yak hair & ends of flash and tie in. Again be certain all is bound strictly to the top of the fly. Cement.


13) Wrap thread forward and begin building up the rest of the fly to more closely match the diameter of the previous tie-in.
14) Tie in blood quill marabou (I tie in the butt section) just ahead of previous tie-in, and palmer it forward, making 3-5 wraps and tying it off. Wrap forward/backward again to build up the head.


15) Next, tie in a subtle skirt of flash material & palmer it to your liking but leave enough room for head and eyes (optional). Tie off and build up the head to your liking.


16) I use UV adhesive to attach the eyes and make a tooth-proof head.


Variation on the Shannon's Fly ...posted 7/18/12 _ _ _ _ _ _ _ _ _ _ _ _ _ _ _ _

As I reported on the Home page, this fly sinks much more quickly than the original Shannon's Fly. Please see the link below for the video with fly tying instructions on how to tie the Shannon's Fly.
http://www.youtube.com/watch?v=Fl5ZJSZQ_J0
It is an easy tie. However, while Cornwall warns the tier not to tie the tail too tightly as it can kink up, if you tie it too loosely, the original fly will display great action for a few casts and then begin to fall apart at the tail. It may take a couple of tries to get the fly tied 'just right', but it is well worth the effort!
I purchased my pack of pearl chenille at J Mac Sports in Moline, IL. (see link on home page), for $2.49. I was able to tie 6 flies with this pack of material.
_ _ _ _ _ _ _ _ _ _
the Guelk Nymph ...posted 1/21/12
 I created this pattern in early 2011. I have found success with it on NE IA and WI streams, having fished it either as a nymph or as a streamer.
TMC 200RBL #16 hook
1/8” (3.2mm) tungsten bead
3/0 waxed monocord, brown (or 140 or 6/0)
Elk rump, natural
Ostrich herl, tan
Small, natural guinea feather
Head cement
1) Slip 1/8” bead on hook and place in vise. Lay down thread to hold bead in place and wrap back to hook point.

2) Tie in sparse amount of elk rump for the tail. The tail should be no greater length than length of the hook. Leave bobbin at elk tie-in point.

3) tie in ostrich herl at previous tie-in point and wrap thread to slightly before bead.
4) Tie in butt side of guinea feather, convex side down with tip directed over eye of hook (there is more than 1 correct way to position the feather). Leave just enough room to wrap the feather forward one complete turn. Leave bobbin here.
5) Wrap herl forward ending with one wrap in front of guinea. Tie off.

6) Wrap guinea forward, one complete turn, around hook shank. Tie off. Build up thread base so there is a nearly smooth transition from bead to body. Whip finish and add a couple dabs of head cement to the thread wraps. Now, tie a few more and go fish!

Guinea Bugger (& Guinea Bugger Deluxe)...posted 2/6/11
 Mustad 9672, sz 2 streamer hook (down to sz ~6) or similar, such as TMC 5263
Brown 3/0 or larger thread (match thread to chenille color)
.025 non-toxic wire
Olive marabou
Flash: olive pearl Krystal Flash; 6-9 strands
Flash: Mylar Motion black Spectra Flash; 3-4 strands (I use this flash in all colors of GB & GBD)
Chenille, med (or small if you don’t have a long, spotted portion of guinea feather)
Fl. Chart Guinea Feathers (best = spotted portion 1.5” & longer)
1) Quickly lay down a thin thread base on hook shank, stopping when nearly level with hook point.

2) Add ~14 wraps of wire to hook shank, leaving enough room behind the eye to taper the head & tie in the guinea without difficulty.

3) Add to the thread base & begin covering the wire with the thread, starting a taper from wire down to shank. (leave bobbin near bend of hook)

4) Tie in olive marabou for the tail. Tail should be ~1 ¼ length of hook & be tied down at end of thread base and wrapped up to just behind the wire. (leave bobbin near base of tail)

5) Tie in flash. Trim at different lengths, but most should be at least tail length. (leave bobbin at base of tail)

6) Tie in chenille at base of tail. Wrap thread toward eye of hook, leaving bobbin ~1/8” from eye to leave room for the head.

7) After removing the fluff, place a guinea feather dark side (top of feather) down with tie-in point of feather base lined up with the bobbin. Tie in the guinea, wrapping snugly. (estimate how far the guinea will wrap back on the chenille-covered shank & leave the bobbin hanging there…or for GBD version, tie in 2nd marabou clump then Krystal flash. Tie-in will vary on how far the guinea will wrap back on the shank. Plan to leave 1/8-1/4” distance from end of wrapped guinea to marabou tie-in point. This marabou should blend with the tail. For GBD, leave bobbin hanging 1/8” or more in front of 2nd marabou tie-in)


8) Wrap the chenille forward (including abutting the back and front of the 2nd marabou clump if tying the GBD), allowing it to hang via hackle pliers at just behind the guinea tie-in point.


9) Wrap the guinea rearward(partially binding down the chenille), brushing the feather forward as needed to avoid trapping individual feather fibers. Tie off the guinea with 3-5 thread wraps. If desired, add head cement to this tie-in point.

10) Wrap thread forward, waving the bobbin to and fro to keep from trapping feather material.
11) Tie off chenille with the thread, then smooth back feathers sticking out over the eye of the fly & make a couple more wraps. Further build up the head of the fly, if desired.
12) Whip finish the fly & trim off the thread. Use a dubbing needle to carefully pull any trapped guinea fibers free from thread. Add cement to the head of the fly, let it dry, & fish that fly!


- - - - - - - - - - - - - - - - - - - - - - - - - - - - - -
 Fluffy Butt...posted 10/3/10
Mustad 9672 sz 2 streamer hook
Medium red dumbbell eyes
Medium wh or blk wooly bugger chenille
Wh or blk blood quill marabou for body
Wh or blk bld quill marabou or bucktail for tail
Small silver (or red if tying blk fly) wire6/0 wh or blk thread (but I use 210 denier when tying w/ bucktail)
1) Wrap thread from eye of hook to just above the hook point.

2) Make a 'cradle' of thread 1/8" away from eye of hook and tie in dumbbell eyes in figure-8 style. Return bobbin to hook bend. Tie so fish hook points up when in water. Cement wraps for more durability.

3) Pinch and roll both sides of marabou for the tail. Tie in so the length of tail at least equals the length of the shank. OR...tie in bucktail in a similar manner.

5) Tie in wire in front of tail with just enough room for 1 wrap of chenille behind the wire. When tying in the wire, run the tag end of wire up most of shank length & leave the bobbin hanging behind the dumbell eyes.

6) Wrap chenille in opposite direction of bobbin thread & place 1 wrap behind the wire to keep the wire from sliding rearward. Do 1 figure-8 wrap of chenille around the dumbbell eyes and tie in where the bobbin is located. Keep bobbin here!

7) For the body, tie in the butt end of the marabou just behind the dumbbell eyes, where the bobbin is located. Again, keep the bobbin here! The fluffy part of the marabou faces the same direction as the hook eye.

8) Wrap the marabou rearward & with enough spacing on the shank to allow it to get close to, but not cross over, where the wire is tied in. Brush the feathers foward as you wrap. Leave the marabou hanging via the hackle pliers when you are finished wrapping.

9) Wrap the wire forward - travelling opposite rotation of the marabou. Wrap snugly, with a side-to-side motion to clear the feathers from the wire. Stop behind the dumbbell eyes. (Trim off the excess marabou hanging from the h.pliers.) Use a few wraps of thread to tie off the wire, wrap the wire a couple more times, tie off wire with the thread again and whip finish. (Prior to the the whip, I loosely wrap another piece of spare wire around the marabou body, keeping the feathers out of my way while I finish the fly.) Add cement for more durability.
***Pls see the first photo for the butcktail version of this fly. The all marabou version is below***
***Pls see the first photo for the butcktail version of this fly. The all marabou version is below***

History of the Fluffy Butt: The pattern was tied this spring when searching for a leach-like pattern to fish for smallies on Chequamegon Bay. I remember seeing a puffy orange-colored marabou fly somewhere on-line. I didn't have the recipe so I 'created' my own version. A friend requested some of these flies, but asked that bucktail be placed in lieu of marabou for the tail. Therefore, there are 2 ways to tie this fly. If you get too crazy wrapping the thread behind the eyes, the fly will look as if it has a long chicken neck & a big, fluffy butt. The fish don't seem to mind. To date, this fly, which resembles either a black leach or a white minnow, has landed bass and pike. ~Twitch