Finally heading back to Hayward this weekend! Back in June I fished the Namekagon for trout and then headed to Chequamegon Bay to meet up with a friend for smallie fishing and sand camping. Timing for musky just wasn't in the cards on my birthday weekend.
But now..... oh baby..... it's time for Musky!!
Hitting the water with Musky Country Outfitter's head guide & friend Brad Bohen. The water to be fished, as yet, is a mystery but I have faith Brad will get us the best opps for tail-walking toothiness!
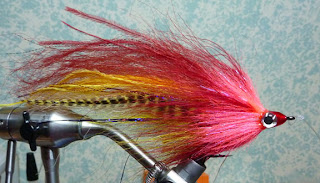
I tied up a new Musky fly. It's current name is: Prototype... as that is exactly what I think it will turn out to be when it hits the water! However, you put a little passion, a decent amount of thought, and a late night into something and it just needs to find some Esox water to truly discover its swimming potential.
I have two months of work-free weekends.... just so I can drop most anything for a chance to hit the Musky trail. Bring on that fall feedbag!!!!!!! Let's hit the Musky Trail. Yeah baby!!!!
Thursday, August 30, 2012
Monday, August 27, 2012
UV-Cured Adhesive (Resin) & Buoyancy of Fly Tying Fur for Musky Flies
So, I sat down tonight to tie a musky fly. I planned to experiment again with skunk tail. Then, I recalled the one skunk fly I did fish was fairly buoyant in the water –something I didn’t want occurring with the next fly.
At that point, my plans ran amuck. Experiments with buoyancy of 3 fly tying materials occurred, along with readying a few newer flies for an upcoming musky trip.
I examined another skunk fly and a couple other musky flies I'd fished this weekend. Then, I reinforced some fly heads with Loon UV Clear Fly Finish. BTW, I give this resin –at this time anyway- an ‘A’. If it didn’t still feel a little ‘tacky’ after hitting it with my Loon UV mini light, it would get an ‘A+’. I make it a point of setting the flies outside in the sun for a short time and most of the tacky feeling is then gone. I believe this commonly occurs with many light-cured resins. The tiny version of the Loon UV light also has an on/off button which is easily pressed. If thrown in a bag and there is pressure on the button, one may later discover the light has dead batteries. If my opinion later changes on the resin I will post something at that date. For now, I believe if one uses a good light-curing resin, there is no going back to other adhesives for big fly heads. Time is precious. (BTW, I've reviewed a couple of resin-curing UV lights. Here is the link: http://strip-n-twitch.blogspot.com/2012/11/a-fly-tiers-comparison-of-uv-curing.html ** I've learned that using these light-cured products can make fly tying more efficient and creative, but these resins are not without their 'quirks'. Following more research, I plan to post tips and tricks to increase one's ability to successfully cure the resin and to maintain an appropriate resin-fly bond. In the meantime, visit your product's website for more information. If your questions aren't answered there, visit the competitors' websites; chances are you will find some answers. UPDATE 1/9/13: 'Tips for Use of Light-Cured Resins' to be posted very soon!) http://strip-n-twitch.blogspot.com/2013/01/major-light-cured-resin-players-answer.html
Now on to ‘the nonscientific hairy experiments’: I filled a glass bread pan with water. Then, for the first test, I cut similar amounts of fur from near the tips of a skunk tail and a slightly crinkly buck tail. I also cut fur from near the base of another skunk tail. I placed all 3 bunches of fur on the water and they floated on the surface for ~20 minutes. Then, I pressed each down uniformly below water level. The slightly crinkly buck tail was the most buoyant, remaining in the surface film of the water with tips slightly lower. Surprisingly, the skunk tail taken from near the tip floated mid-surface (tips slightly lower) while the skunk tail from the tail’s base sunk to the bottom. After 8 minutes, I pressed down again & there was little change in the buoyancy, except that the buck tail and skunk tail (taken from the tail’s tip) had sunk the tiniest bit more in the water column.
Then, to compare the base and tip of one skunk tail, I took hair hanks from the base and tip of the tail which had previously sank to mid-surface. Again, the hair taken from nearest the tail’s base sat lowest in the water with the tips lower. Buck tail again remained in surface film and & skunk fur taken near tail’s tip presented with tail tips mid-surface & base in surface film.
So, to be clear, the slightly crinkled buck tail (fur taken near the tip) was the most buoyant –sitting in the surface film, the skunk tail with fur taken closer to the tip, sank to mid-surface, and skunk tail with fur taken near the base sank the lowest- just at/near the bottom.
Then, I tested natural Yak hair (red) and more buck tail. One tail (brown) was straight & had a sheen I wished my hair had. The other tail (orange) was fairly crinkly. I again cut similar hanks of hair & both buck tails were taken from near the tip. I set the hair in the water and after ~1 minute I pushed each one uniformly down to the bottom. The yak hair remained on the bottom. No 2nd-guessing the depth of that one. The tips of the crinkly, orange buck tail sank to the upper portion of water’s mid-surface. The smooth, brown buck tail was buoyant, remaining in the surface film with the tips sinking slightly lower. Then, I cut fur from the base of the fairly crinkly, orange buck tail. Pressing it in the water similarly, it remained very buoyant, sitting the highest of all the tying material, even after 10 minutes.
In summary, if your goal is for your musky fly to sink, the more expensive natural yak hair is your best bet. After this, the ever popular skunk tail with fur taken closer to its base is 2nd best choice. The skunk tail with fur taken from near the tip (it sat mid-surface) is still a 3rd good option. Crinkly deer hair taken from near the tip would be my final choice. If you want your fly to remain fairly buoyant, look for that crinkly buck tail, taken from the base. That sexy, shiny, straight buck tail, taken from the tip, is a good 2nd choice. I imagine that fur taken from the base of this latter type of buck tail would also be a good choice (but I forgot to check that out).
I won’t promise that you will have the same results in your tying room. However, it doesn’t take much time to trim off a hank of fur, immerse it in a little water & experiment for yourself. Back to that buoyant skunk tail fly: the skunk fur was taken from the tip & I also incorporated buck tail, most likely taken from near the base. A few feathers had been tied in as well. Now I know why I had a buoyant fly! As far as buck tail goes, generally if you tie with the fur from the base, it will flair more. It is also generally longer than the fur at the tip. These were characteristics I desired when attempting to create a larger, bigger profile fly, but now I fully realize the trade-off. I sense a new, quicker-sinking musky fly in my near future!
Subscribe to:
Comments (Atom)


